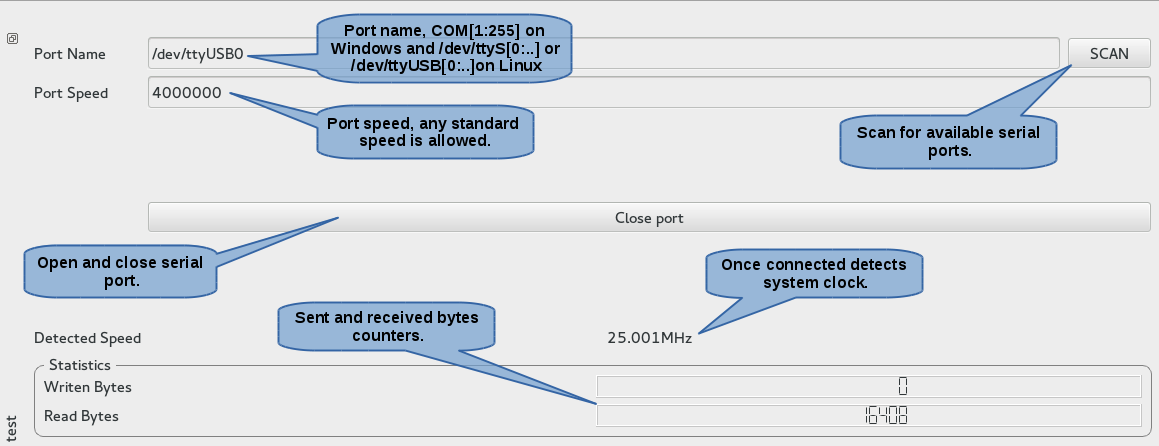

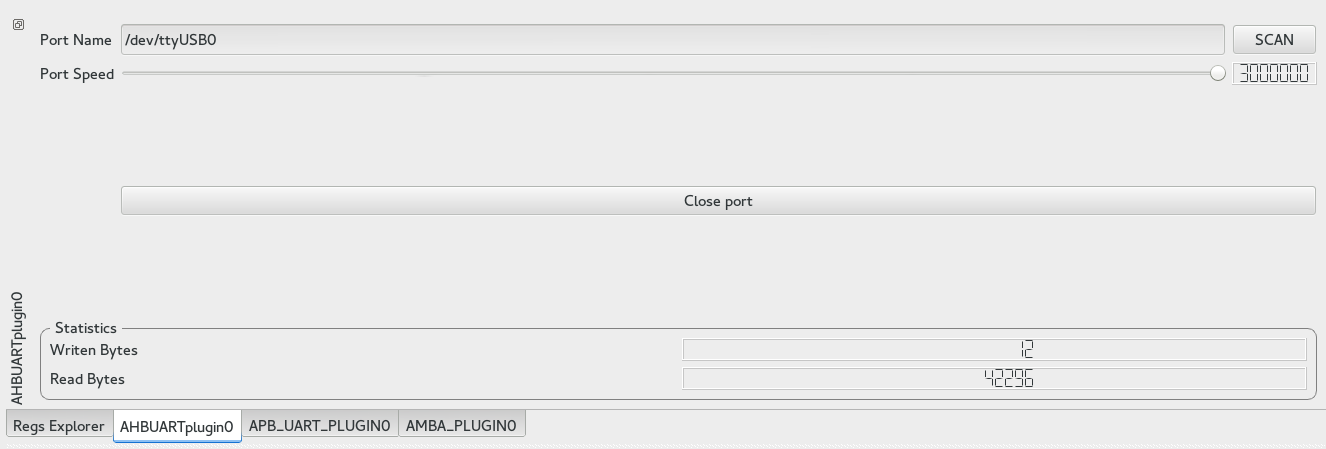
The AHBUARTplugin is a root plugin which allows you to connect to any SOC using gaisler's AHBUART IP. The plugin is capable of scanning available serial port on the computer and measuring system clock if a DSU3 IP is also present. Before any transaction it will check if the device is still connected by reading at 0x80000000.
Methods list:
Opens given PortName with given baudrate and returns true if success.
On Windows PortName is COMx where x is the port number.
On Linux PortName may be "/dev/ttySx" if you are using an integrated COM port or "/dev/ttyUSBx" if you are using an USB to RS232 converter. In both case x is the port number.
Example:
Here we will connect to target through /dev/ttyUSB0 at 3Mbaud and print success if we succeed.
proxy.loadSysDriver("AHBUARTplugin","AHBUARTplugin0")
if AHBUARTplugin0.open("/dev/ttyUSB0",3000000):
  print "success"
else:
  print "failed"
Closes current port and tells child plugins that it is disconnected. If already disconnected, does nothing.
Search for available serial port on the computer. This method isn't much useful in the python terminal since the list of serial ports will be used only for completion on the GUI.
Returns the system clock. This method will only work if a DSU3 IP is present on the soc and the timetag counter is counting.
 |
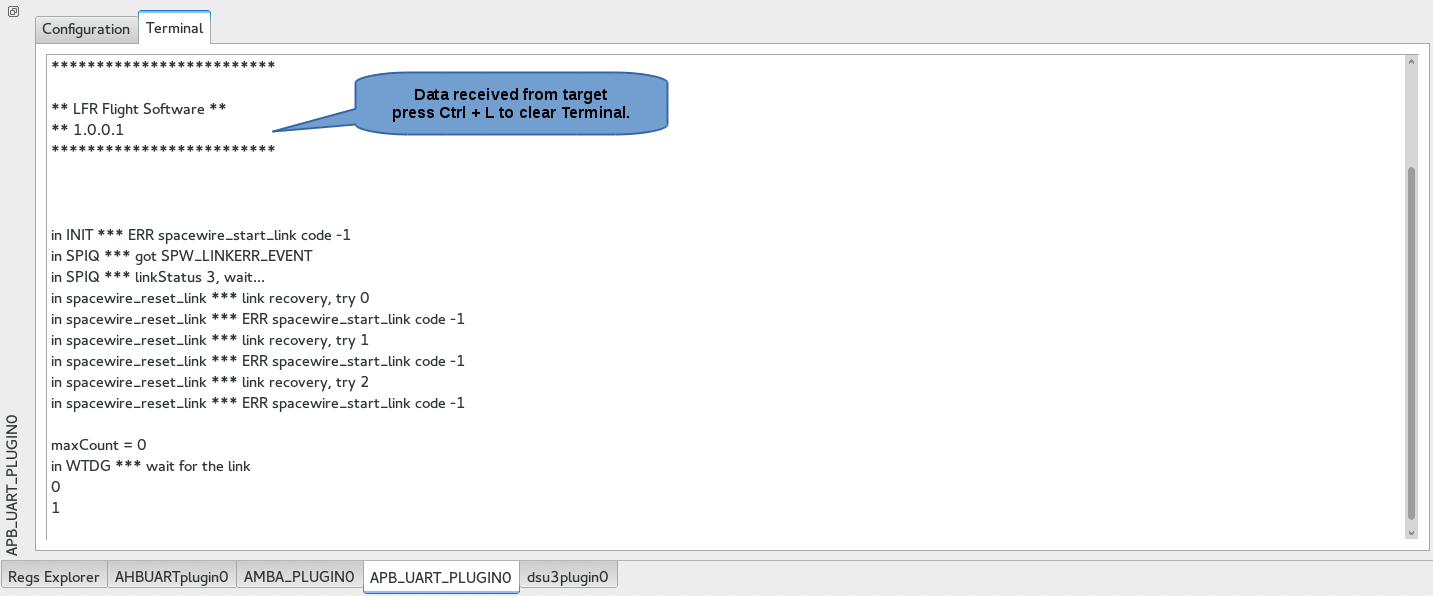 |
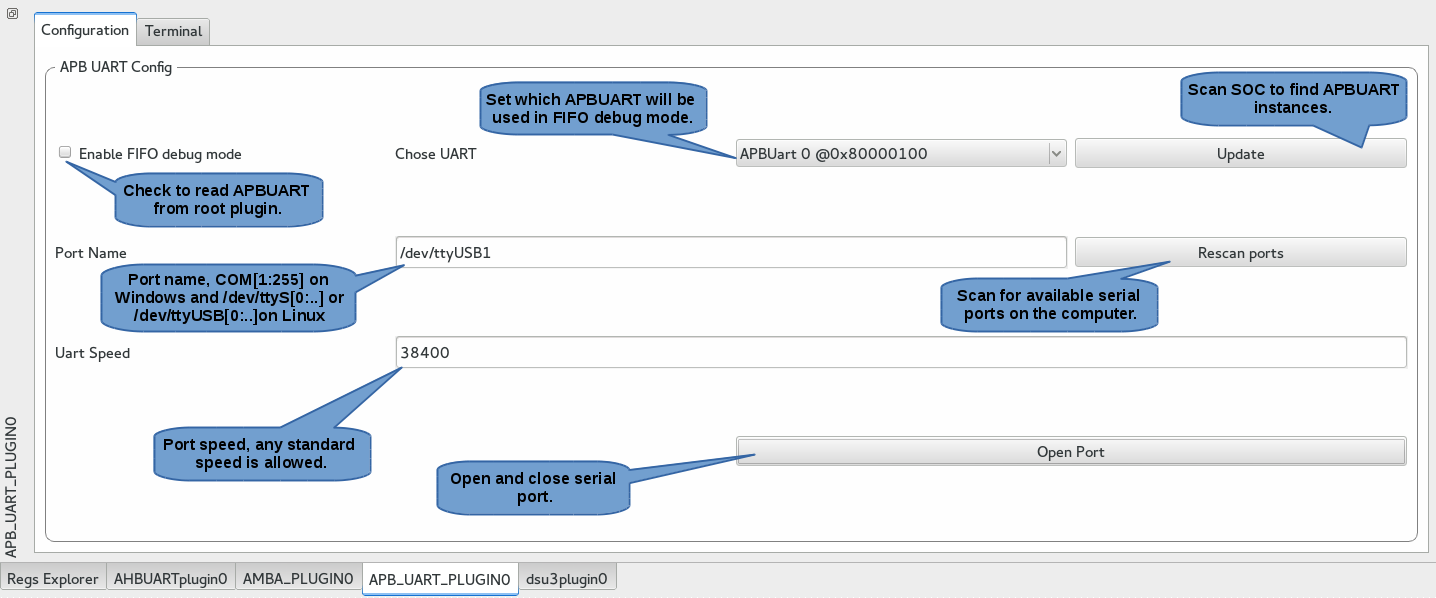
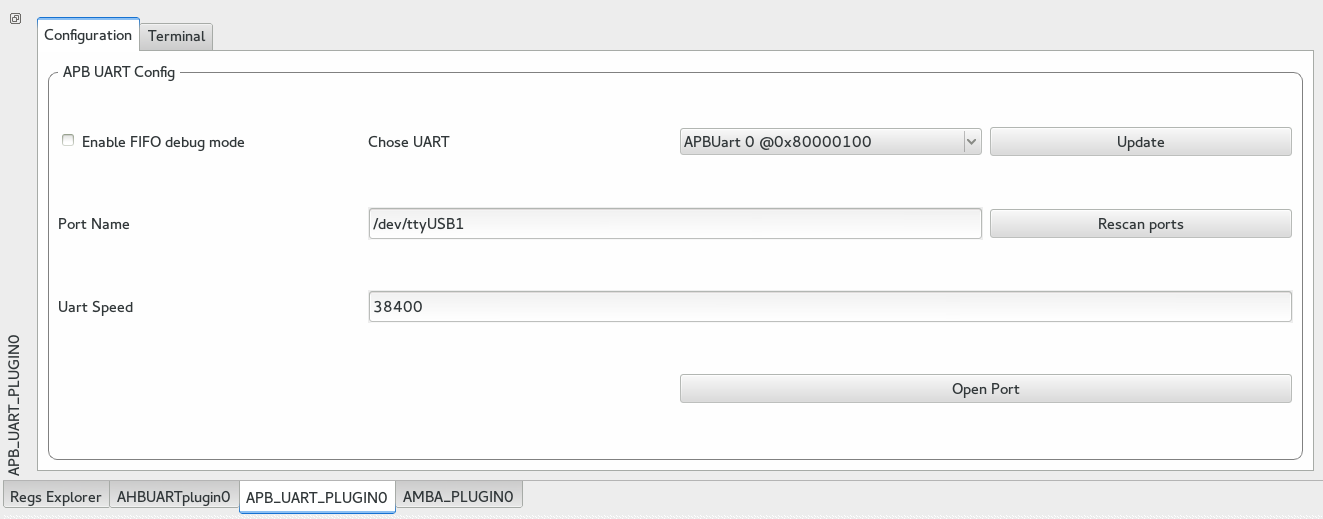
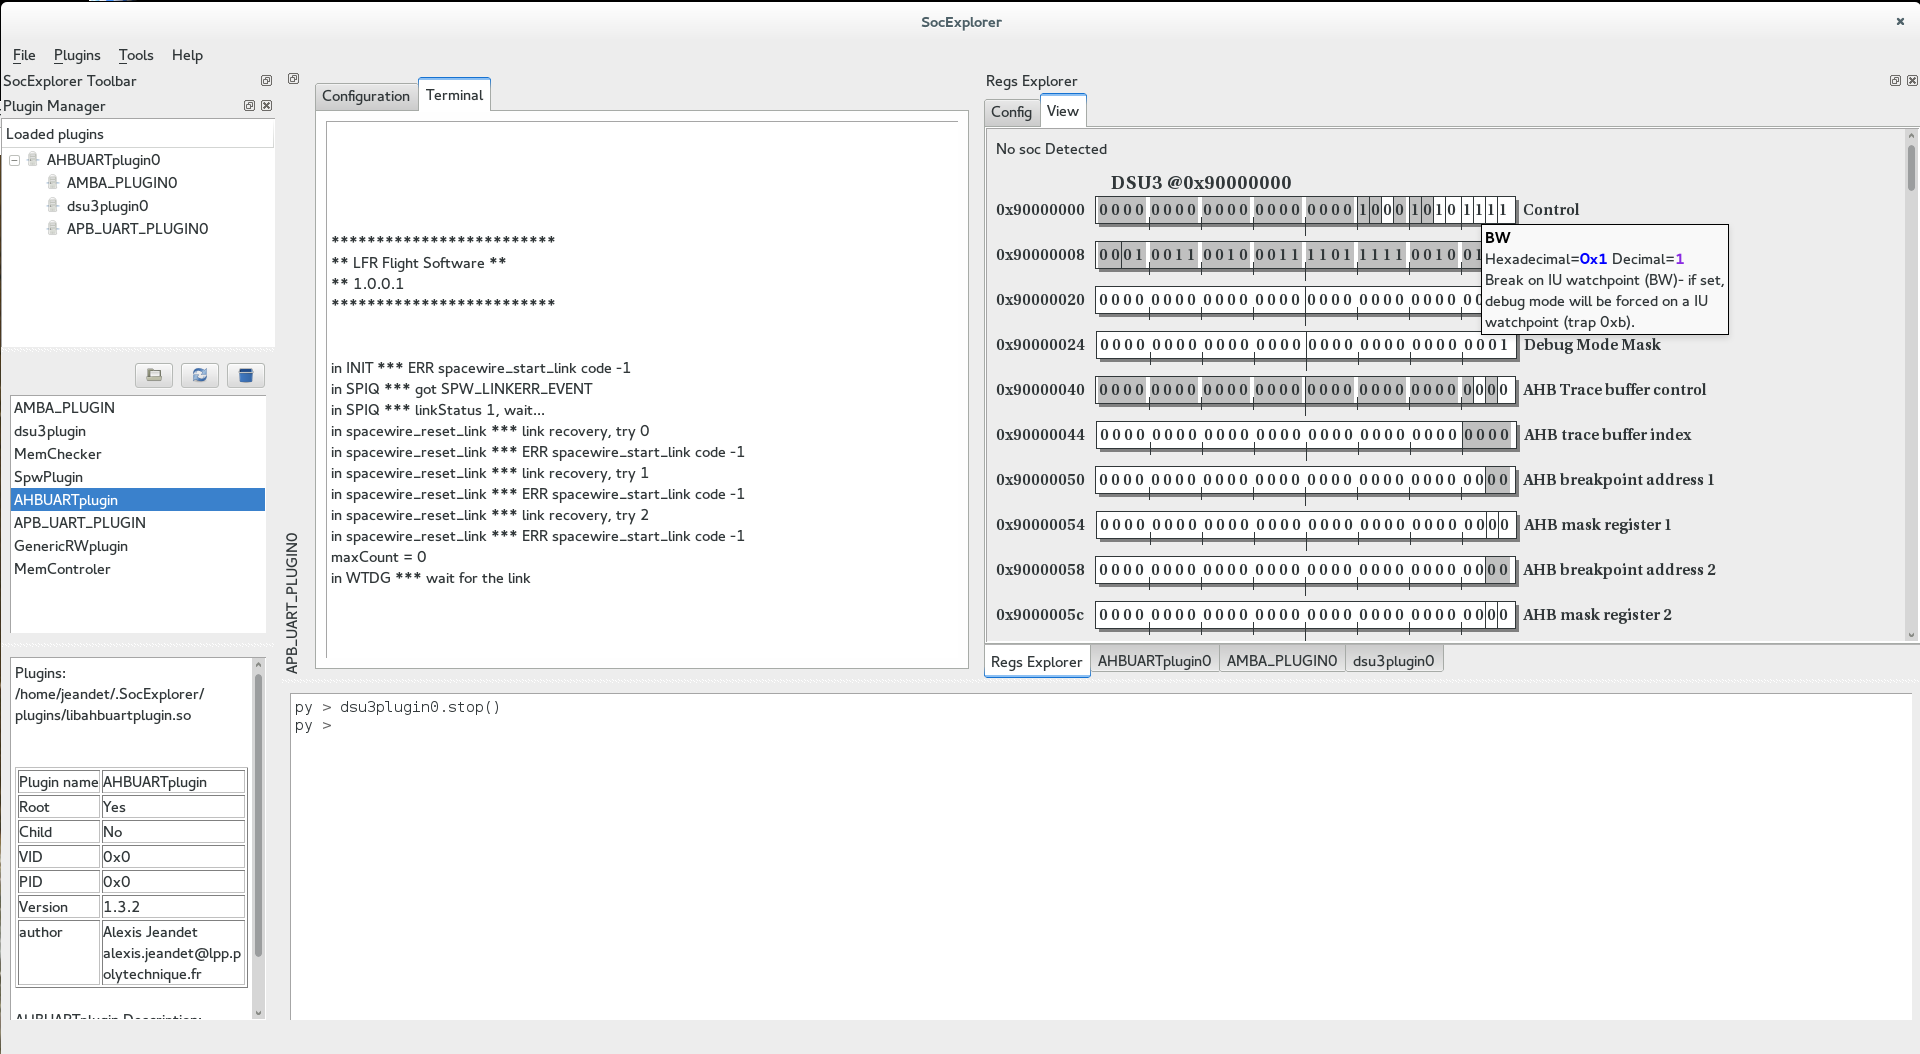
The APB_UART_PLUGIN is a child plugin which allows you to print gaisler's APBUART output. Usually the APBUART is the default device where the printf are redirected which makes sense to print it in ascii in a terminal.
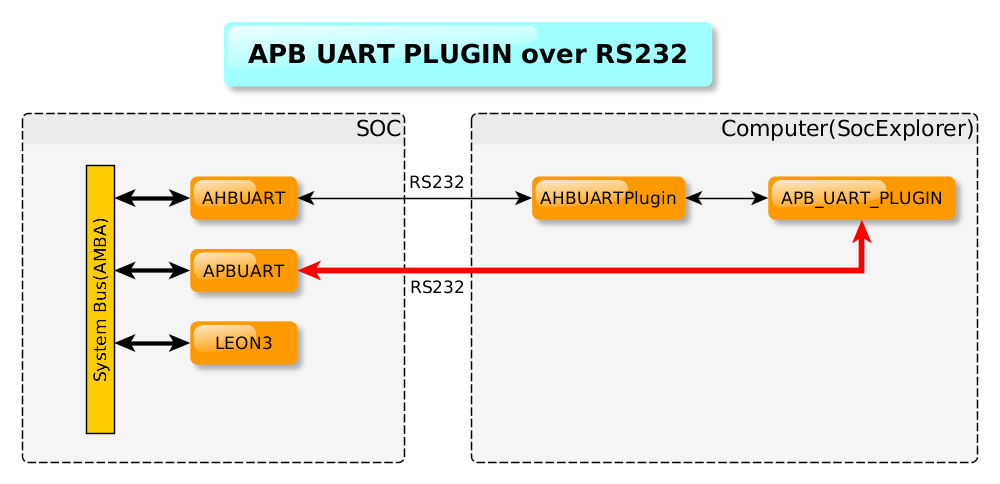
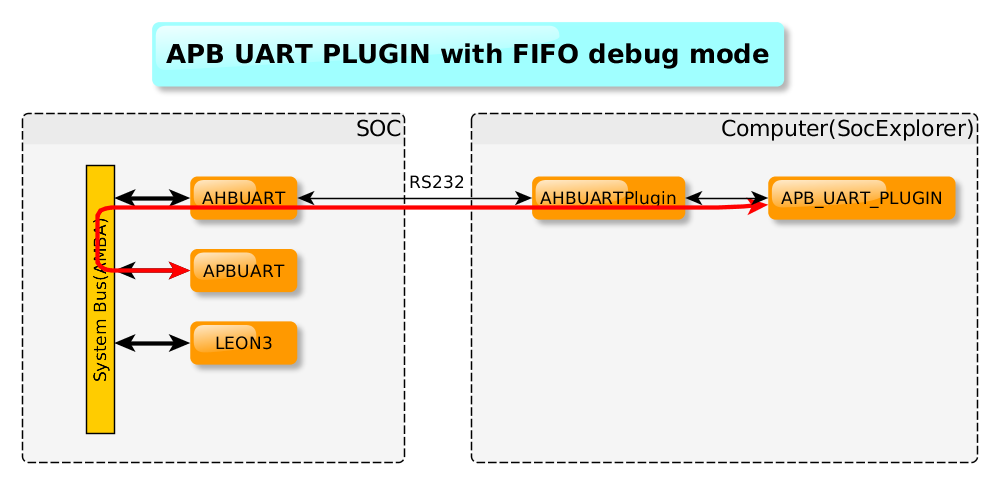
This plugin is able read the APBUART output either directly from it's output on a serial port or in FIFO debug mode with the root plugin. See illustration below.
 |
 |
Methods list:
Once you have installed SocExplorer from sources on your system, it should have added an new template to QtCreator. You can create a new plugin skeleton filling the wizard forms. Your plugin description is written in its qmake project file.
A SocExplorer plugin inherits from the socexplorerlugin base class which inherits from QDockWidget.
Through SocExplorerEngine object you get some shared and centralized services.
Instead of using printf inside a plugin to print some information, you can use this function:
void SocExplorerEngine::message(socexplorerplugin *sender, const QString &message, int debugLevel)

//From your plugin:

SocExplorerEngine::message(this,"Here is a message with a debug level of 2",2);
With this function you will centralize all the plugins messages and they will share the same formalism. Note that you can set the debug level of your message, if the message debugLevel is lower than SocEplorer loglevel then the message will be printed else it will be dropped.
To set the SocExplorer debug level you can use the -d option like this:
socexplorer -d 4 #all the message with a debug level or equal lower than 4 will be printed
You don't necessary know the address of the peripherals present in your soc when you write a plugin for SocExplorer. So SocEplorer allows you to enumerate the peripheral inside your soc at run-time and share their base address with other plugins.
To enumerate a device/peripheral:
int addEnumDevice(const QString& rootPlugin,int VID,int PID,qint32 baseAddress,const QString& name);

//From your plugin:
QString devname = SocExplorerEngine::getDevName(VID,PID); // If the device is known you will get it name
SocExplorerEngine::addEnumDevice(this,VID,PID,BaseAddress,devname);
Now to get a peripheral base address:
qint32 getEnumDeviceBaseAddress(const QString& rootPlugin,int VID,int PID,int count=0);
     //or
qint32 getEnumDeviceBaseAddress(socexplorerplugin* plugin,int VID,int PID,int count=0);

//From your plugin:
unsigned int DSUBASEADDRESS = SocExplorerEngine::self()->getEnumDeviceBaseAddress(this,0x01 , 0x004,0); //you will get the Grlib's DSU3 base address
For example once you get successfully connected to the target through a root plugin you may want to automatically trigger an AMBA bus scan with the AMB plugin.
void loadChildSysDriver(socexplorerplugin *parent, const QString child);

//From your plugin:
socexplorerproxy::loadChildSysDriver(this,"AMBA_PLUGIN");
Please note that SocExplorer is still under development, so things are supposed to move, it can fail to build sometimes or be buggy. Feel free to send us some bug reports!
If you are using Fedora, you can directly install socexplorer from our repository here
Or alternatively here
All the next steps can be distribution dependent SocExplorer development is done on Fedora 23, but is should work with any other one, feedback are welcome!
  qmake-qt5
  make
  sudo make install
hg clone https://hephaistos.lpp.polytechnique.fr/rhodecode/HG_REPOSITORIES/LPP/INSTRUMENTATION/SocExplorer SocExplorer
  cd SocExplorer
  qmake-qt5
  make  #note that to speedup the make step you can use "make -j N" to parallelize on N process(replace N with the number of cores you have).
  sudo make install
  #this doesn't install the registers xml description file.
  mkdir -p ~/.SocExplorer/config
  cp ressources/Grlib.xml ~/.SocExplorer/config/Grlib.xml
Now you should have a working SocExplorer, you can continue to install plugins or start write your own plugins.
If you are here it assume that you have an updated and working version of SocExplorer.
To get LPP's SocExplorer plugins you can either clone or download them from here":https://hephaistos.lpp.polytechnique.fr/rhodecode/HG_REPOSITORIES/LPP/INSTRUMENTATION/SocExplorerPlugins.
hg clone https://hephaistos.lpp.polytechnique.fr/rhodecode/HG_REPOSITORIES/LPP/INSTRUMENTATION/SocExplorerPlugins SocExplorerPlugins
Then first you may want to build only the plugins you plan to use, for example the SpaceWire plugin rely on STAR-Dundee usb driver which isn't free so if you don't have it you can't use it. To disable a plugin you have to edit the top qmake project file "SocExplorer_Plugins.pro" and remove the plugin folder name inside or comment it. As example if we want to disable the SpwPlugin and the memcheckplugin:
The file was initially:
TEMPLATE = subdirs
CONFIG   += ordered

SUBDIRS = \
    ahbuartplugin \
    ambaplugin \
    APBUARTPLUGIN \
    dsu3plugin \
    genericrwplugin \
    memctrlrplugin \
    memcheckplugin

unix:SUBDIRS +=  spwplugin
Then it become:
TEMPLATE = subdirs
CONFIG   += ordered

SUBDIRS = \
    ahbuartplugin \
    ambaplugin \
    APBUARTPLUGIN \
    dsu3plugin \
    genericrwplugin \
    memctrlrplugin
  cd SocExplorerPlugins
  qmake-qt5
  make  #note that to speedup the make step you can use "make -j N" to parallelize on N process(replace N with the number of cores you have).
sudo make install
SocExplorer allows you to view and edit in live your SOC peripheral as long as you describe them in a dedicated XML file. Note that SocExplorer will automatically show your peripherals in the Register Explorer pane as soon as you enumerate them.
Here is the SocExplorer plugin list, we try to keep it updated as much as possible.

This plugin allows you to edit or view any memory space of your SOC. You can choose the start address and the number of bytes you want to read or write.
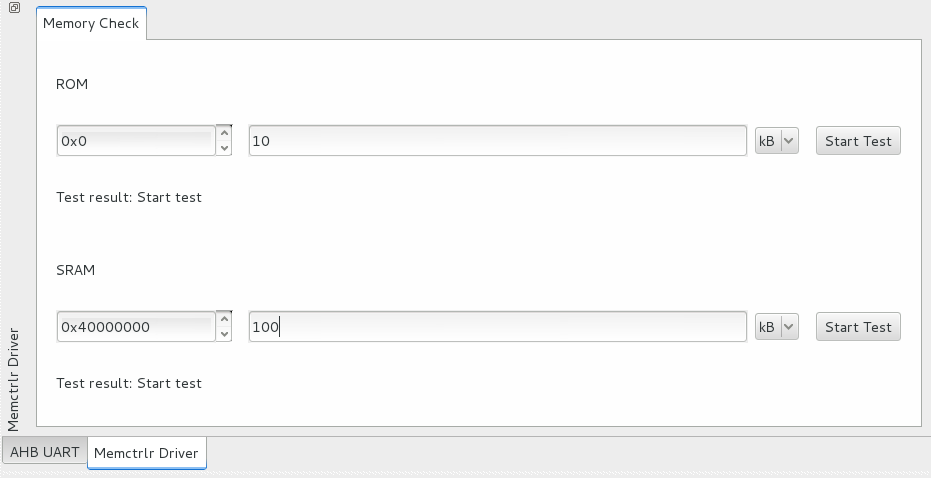
This plugin checks the a memory space and say if it can read and write to this space without any error. To ensure that there is no aliasing problems it generates a random number sequence in RAM, writes it to the destination memory space then read it and compare what he read with what he writes. It can be useful to detect memory controller configuration mistakes or soldering issues.

This plugin handles the Gaisler' s plug and play AMBA bus, you can use it to list the available peripherals. All detected peripheral information will be shared by SocExplorer to all the other plugins and available in Python. For more details have a look here
This plugin allow to load code from an elf file into the leon3 and start it execution. This plugin is experimental and will change a lot before the release state.
SocExplorer software doesn't do anything alone, it is supposed to work with plugin extending its functionality. The development of SocExplorer is based on the observation that most of the SOCs are structured around a central memory bus with a direct addressing, so if you can get a read an write access to this bus you can do anything you want on your SOC. But for the same SOC you can have different way to connect to it, with a serial port, a jatg port, the rmap protocol over SapceWire... . On different SOCs you can use the same way to connect but you can have different layout or different peripherals list. To write less code we decide to make a plugin for each functionality and to use a hierarchical way to instantiate plugins. First you have to connect to your SOC with a compatible plugin we call the root plugin, this plugin will give the access for all its children plugins to the SOC. That's the first level of hierarchy, you can have more levels if for example on your SOC have a other memory buss you access from a bridge on the main one without direct addressing.
Note that you can also make fake root plugins if you just want to make plugin which can be instantiated alone, but doesn't provide any access to any child plugin.
All SocExplorer plugins expose some common functions and their own functions to the embedded Python terminal.
All this functions are either implemented in the base class socexplorerplugin or in the plugin itself. They are described with their C++ interface since they are dynamically wrapped in the Python context. To have a better understanding of how the arguments are converted between Python and C++ you can have a look here. You can call any of the following methods from any plugin instance; MyPluginInstance.Method(...).
Function list:Reads target memory at given address and return its content. On any root plugin it will read system memory and by default on child plugin it will forward request to parent plugin util it reach root plugin and read system bus.
Note that this function could be re-implemented on a child plugin and have a different behavior.
The returned list is a Word list which means that the smallest data you can read is a word(32 bits) and count is the number of words to read. The function respect host endianness so it will convert data depending on target endianness.
See also void Write (unsigned int address, QList<QVariant> dataList);
Writes given datalist at given address in target system bus. On any root plugin it will writes system memory and by default on child plugin it will forward request to parent plugin util it reach root plugin and writes system bus.
Note that this function could be re-implemented on a child plugin and have a different behavior.
The given list is a Word list which means that the smallest data you can write is a word(32 bits). The function respect host endianness so it will convert data depending on target endianness.
Example:
Let's consider we have a Leon3 with some RAM at 0x40000000 and we want to write 1 2 3 and 0xffffffff. We are connected to the target through rootplugin which can be replaced by the plugin are using.
rootplugin.Write(0x40000000,[1,2,3,0xffffffff])
See also QVariantList Read (unsigned int address, unsigned int count);
Closes the plugin.
Activates the plugin GUI, this function is called by SocExplorer you may not call this function unless you know exactly what you do. By default if the plugin GUI is disabled, it means that the root plugin isn't connected to the target and that any operation on child plugin are forbidden.
This method will be removed from python context since it may not be used from python terminal.
Dumps the memory content at given address in given file. As for Read method it will read memory word by word and it will handle host and target endianness. The data will be written in ascii with the following format:
0x40000000: 0xad4c0136
0x40000004: 0x665b89c0
0x40000008: 0xabc04748
0x4000000c: 0x8e110724
Where left column is address and right column is the corresponding data word.
Example:
One interesting usage of this method is to dump memory space while your system is running to see if some memory space got modified. In this example we will load an elf file containing an executable to a Leon3 target through the AHBUARTplugin and dump the first 16 bytes before and after execution and compare them. We also assume that the device is attached to ttyUSB0.
proxy.loadSysDriver("AHBUARTplugin","AHBUARTplugin0")
proxy.loadSysDriverToParent("dsu3plugin","dsu3plugin0",AHBUARTplugin0)
AHBUARTplugin0.open("/dev/ttyUSB0",3000000)
dsu3plugin0.openFile("/somePath/someElfFile")
dsu3plugin0.flashTarget()
AHBUARTplugin0.dumpMemory(0x40000000,16,"/somePath/First_dump.txt")
dsu3plugin0.run()
waitSomeTime()  # You can wait or process something or do whatever you want
AHBUARTplugin0.dumpMemory(0x40000000,16,"/somePath/Second_dump.txt")
Then you can for example diff your two files:
diff -u /somePath/First_dump.txt /somePath/Second_dump.txt
See also bool dumpMemory (unsigned int address, unsigned int count, QString file, const QString & format);
This function behaves like bool dumpMemory (unsigned int address, unsigned int count, QString file) except that it allows you to set output file format. Possible format are "srec", "bin" and "hexa".
See also bool dumpMemory (unsigned int address, unsigned int count, QString file, const QString & format);
Sets memory space with given value at given address, as for Write method it will write memory word by word and it will handle host and target endianness.
Example:
In this example we will first clear memory from 0x40000000 to 0x4000000C and then we will write 0x1234 from 0x40000010 to 0x4000002C
proxy.loadSysDriver("AHBUARTplugin","AHBUARTplugin0")
AHBUARTplugin0.open("/dev/ttyUSB0",3000000)
AHBUARTplugin0.memSet(0x40000000,0,4)
AHBUARTplugin0.memSet(0x40000010,0x1234,8)
It is possible to use a Python debugger with SocExplorer, to do so you need to install winpdb (packaged on fedora).
import rpdb2; rpdb2.start_embedded_debugger('some password')
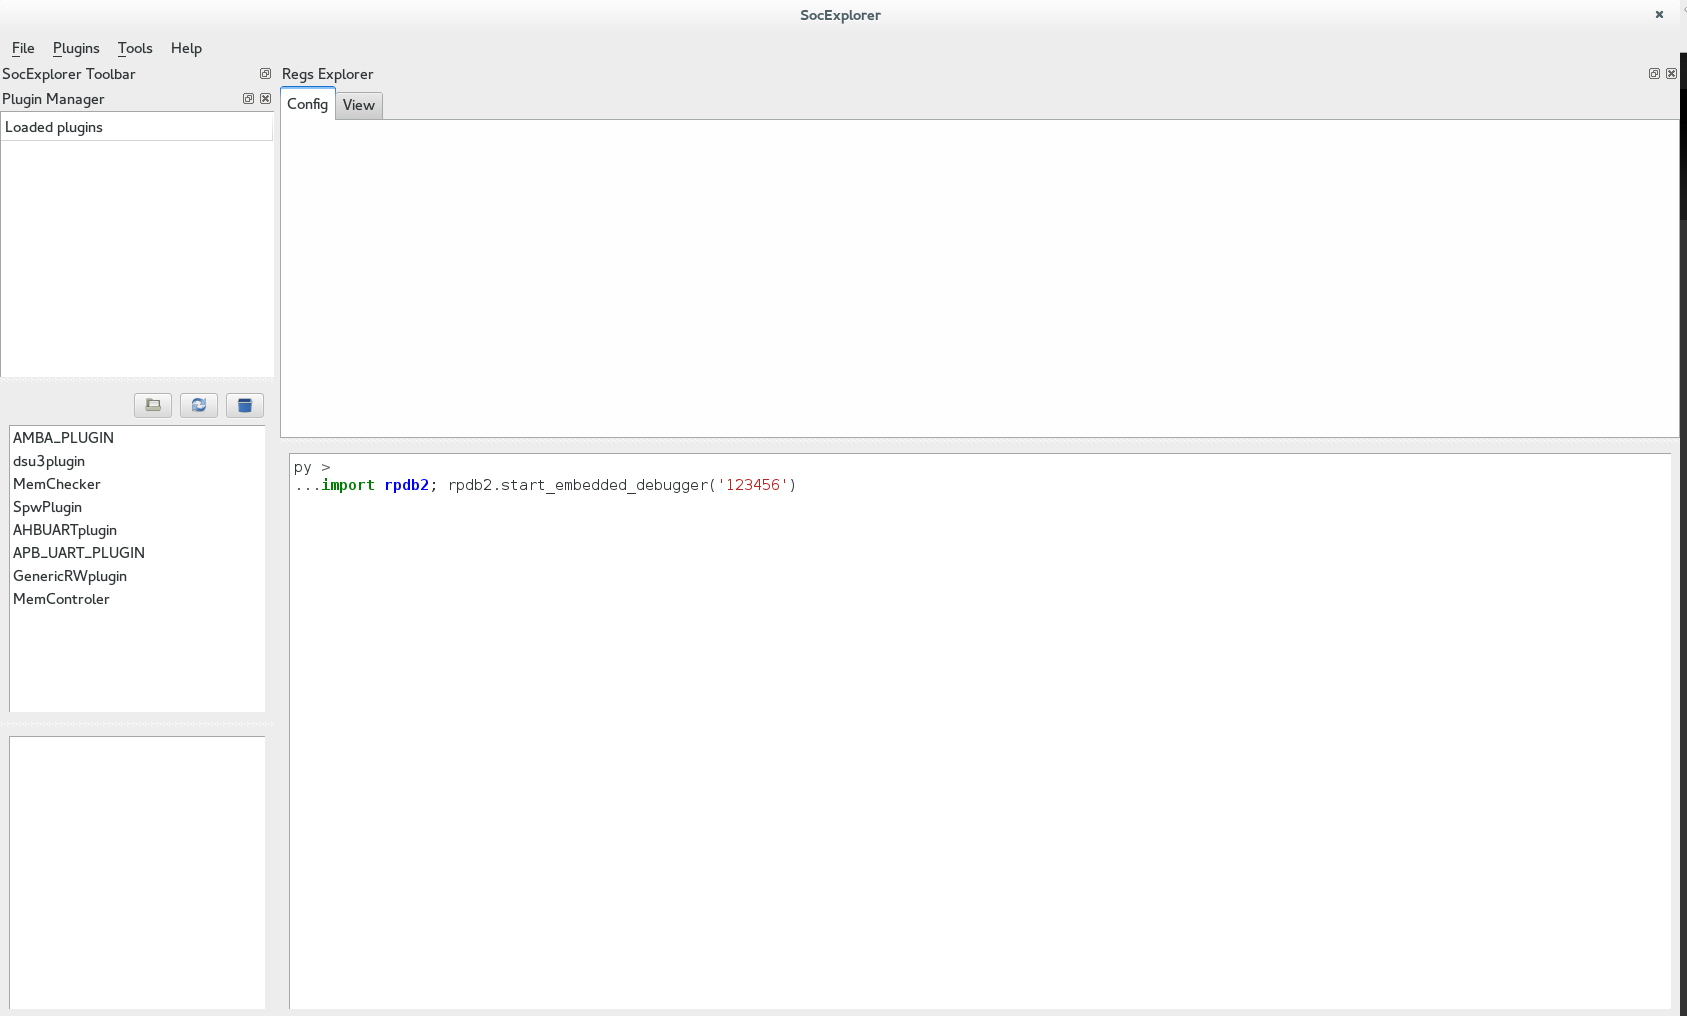
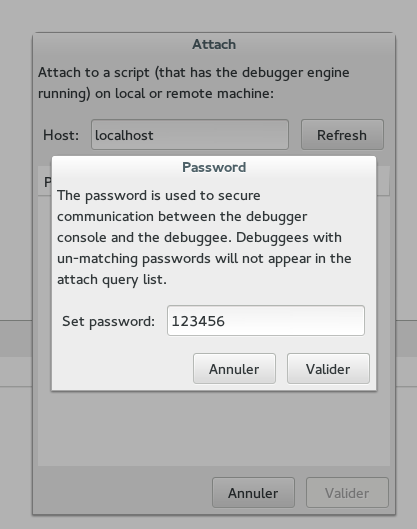
Note that you have to provide the same password than used to start the server!
You should get a list of running sessions like this:
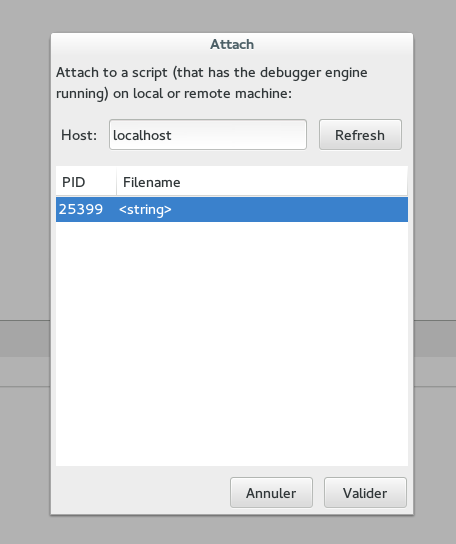
And once connected, you should get this:
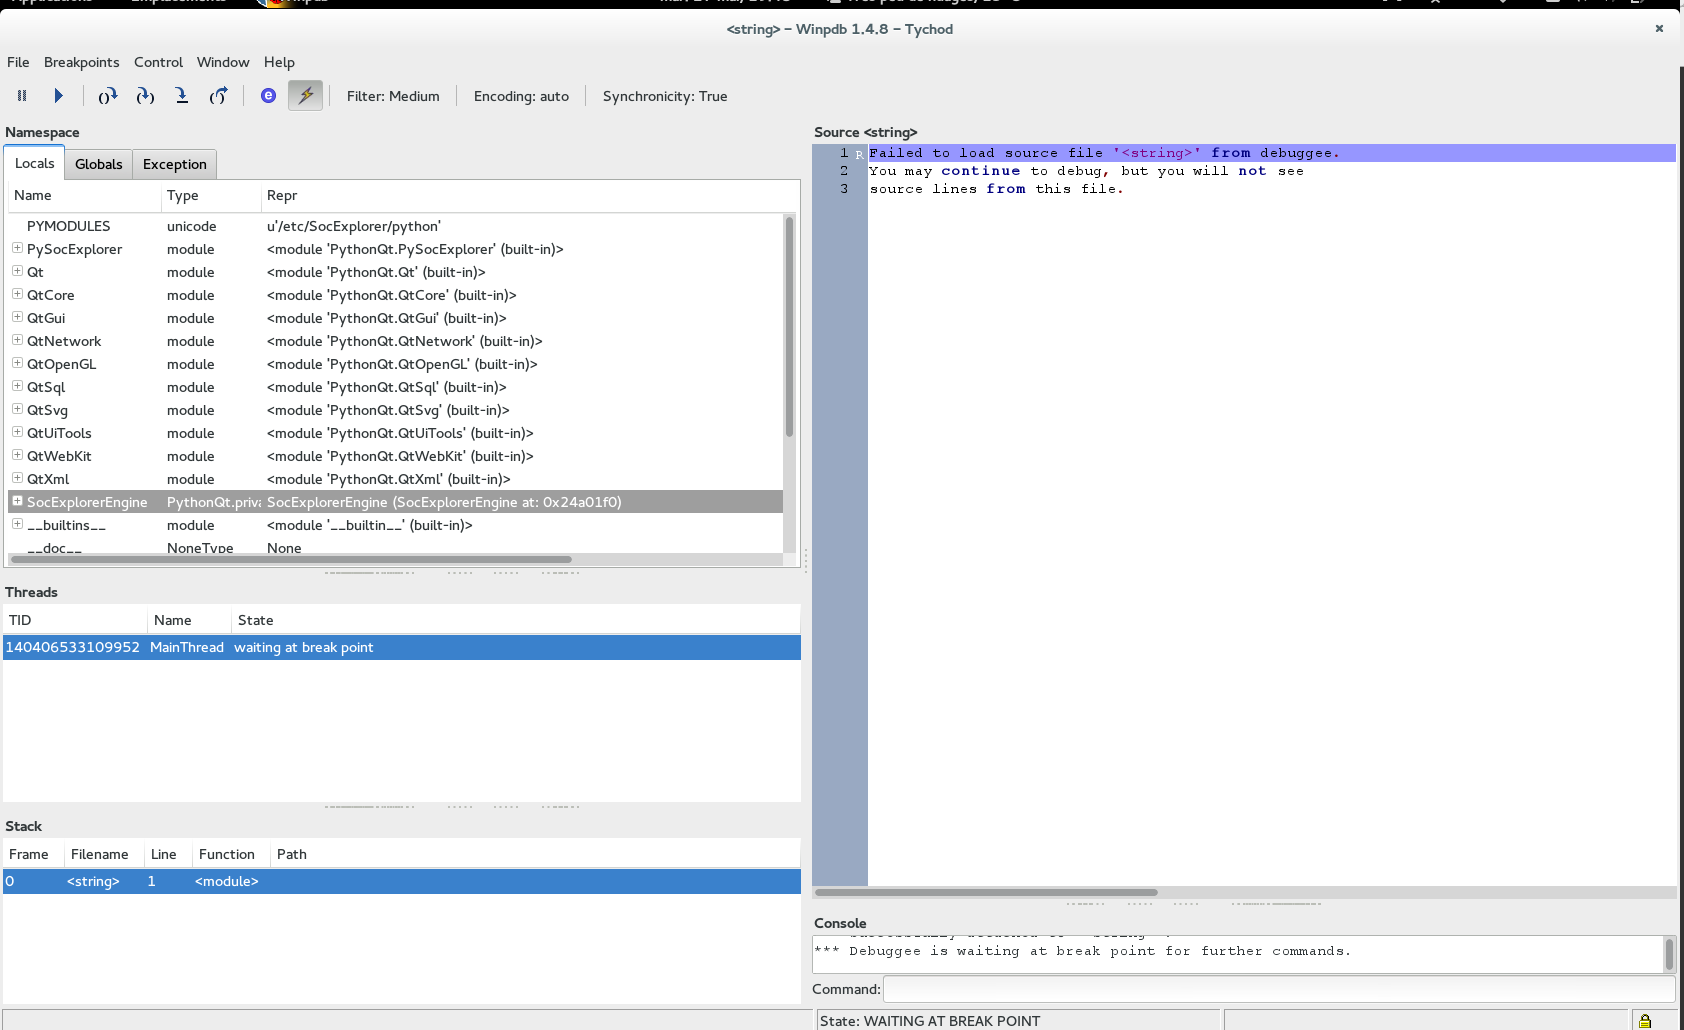

Note that you need to click on the arrow to start debugging but SocExplorer will not evaluate the python file, you need to execute by dragging your file in the SocExplorer Python console, then have some fun!
An interesting feature in SocExplorer is that you can drag and drop a python script in the terminal, it will execute it. First you can get some updated examples in the doc folder of SocExplorer source code.
The key object to load plugins is the proxy object, in SocExplorer console you can type proxy and then with the "tab" key you will get all the available methods. The ones you need are loadSysDriver() and loadSysDriverToParent(), you can get their definition by invoking them without any arguments. In most cases with SocExplorer if you don't know how to use a python method just call it and you will get its definition.
#to load the AHBUART plugin
proxy.loadSysDriver("AHBUARTplugin")
# You can also specify an instance name
proxy.loadSysDriver("AHBUARTplugin","InstanceName")
# SocExplorer can also resolve the plugin from it file name
proxy.loadSysDriver("/home/your-path/.SocExplorer/plugins/libahbuartplugin.so")
# Even without the path
proxy.loadSysDriver("libahbuartplugin.so")
A child plugin need a parent to be connected to.
#to load the GenericRWplugin plugin and connect it to AHBUARTplugin0 instance
proxy.loadSysDriverToParent("GenericRWplugin", "AHBUARTplugin0")
# You can also specify an instance name for the child plugin
proxy.loadSysDriverToParent("GenericRWplugin","InstanceName", "AHBUARTplugin0")
#As for root plugin SocExplorer can resolve the plugin from it file name.
All the plugins will provide you two methods to read or write, with root plugin it means read or write in the SOC bus. With child driver it can have different meaning depending on the plugin. Usually to read or write on your SOC just do:
#rootplugin is your root plugin instance name, address is the address from where you want to read.
#count is the number of words you want to read /!\ usually it is 32 bits words.
#If count=2 you will read two 32 bits words.
data=rootplugin.Read(address, count)

#If you want to write just do
rootplugin.Write(address, [Word1,Word2,...])
Since revision r71 of SocExplorer all plugins offer you some memory dump or load functions. You can easily load an elf, srec or binary file directly in the soc memory or dump any memory space in a binary or srec file.
#rootplugin is your root plugin instance name, address is the address from where you want to read.
#count is the number of words you want to read /!\ usually it is 32 bits words.
#If count=2 you will read two 32 bits words.
#file is the source or destination file name "/yourpath/yourfilename"
#format is the file format 'srec','binary'
data=rootplugin.Read(address, count)
rootplugin.dumpMemory(address, count, file, format)

#If you want to load a file
#file is an abstractBinFile, you need to create one before

#for an elf file
file = PySocExplorer.ElfFile("/yourpath/yourfilename")

#for an srec file
file = PySocExplorer.srecFile("/yourpath/yourfilename")

#for a binary file
file = PySocExplorer.binaryFile("/yourpath/yourfilename")

rootplugin.loadfile(file)
With SOC design on FPGA, you can easily change the number of peripherals or their base address but you don't necessary want to update your python script each time you modify your SOC layout. One solution is to use plug and play feature such as the one provided by the Gaisler's GRLIB. SocExplorer is able to store and distribute the list of peripherals and their address, once a dedicated plugin did the scan for him such as the AMBA plugin. We suppose that the connection to the SOC is active, the scan is done and the root plugin instance name is "RootPlugin".
#this function will return the base address of the first matching VID/PID device in the list
#by convention it is also the lower address one
baseAddress = SocExplorerEngine.getEnumDeviceBaseAddress("RootPlugin",VID,PID)

#you an also specify the index of the device, if you want the second
baseAddress = SocExplorerEngine.getEnumDeviceBaseAddress("RootPlugin",VID,PID,1)
SocExplorerPlot is a wrapper to the QCustomPlot class, a simple and efficient plot widget. The following example should give you this result, please note that you will also need numpy library to run it.
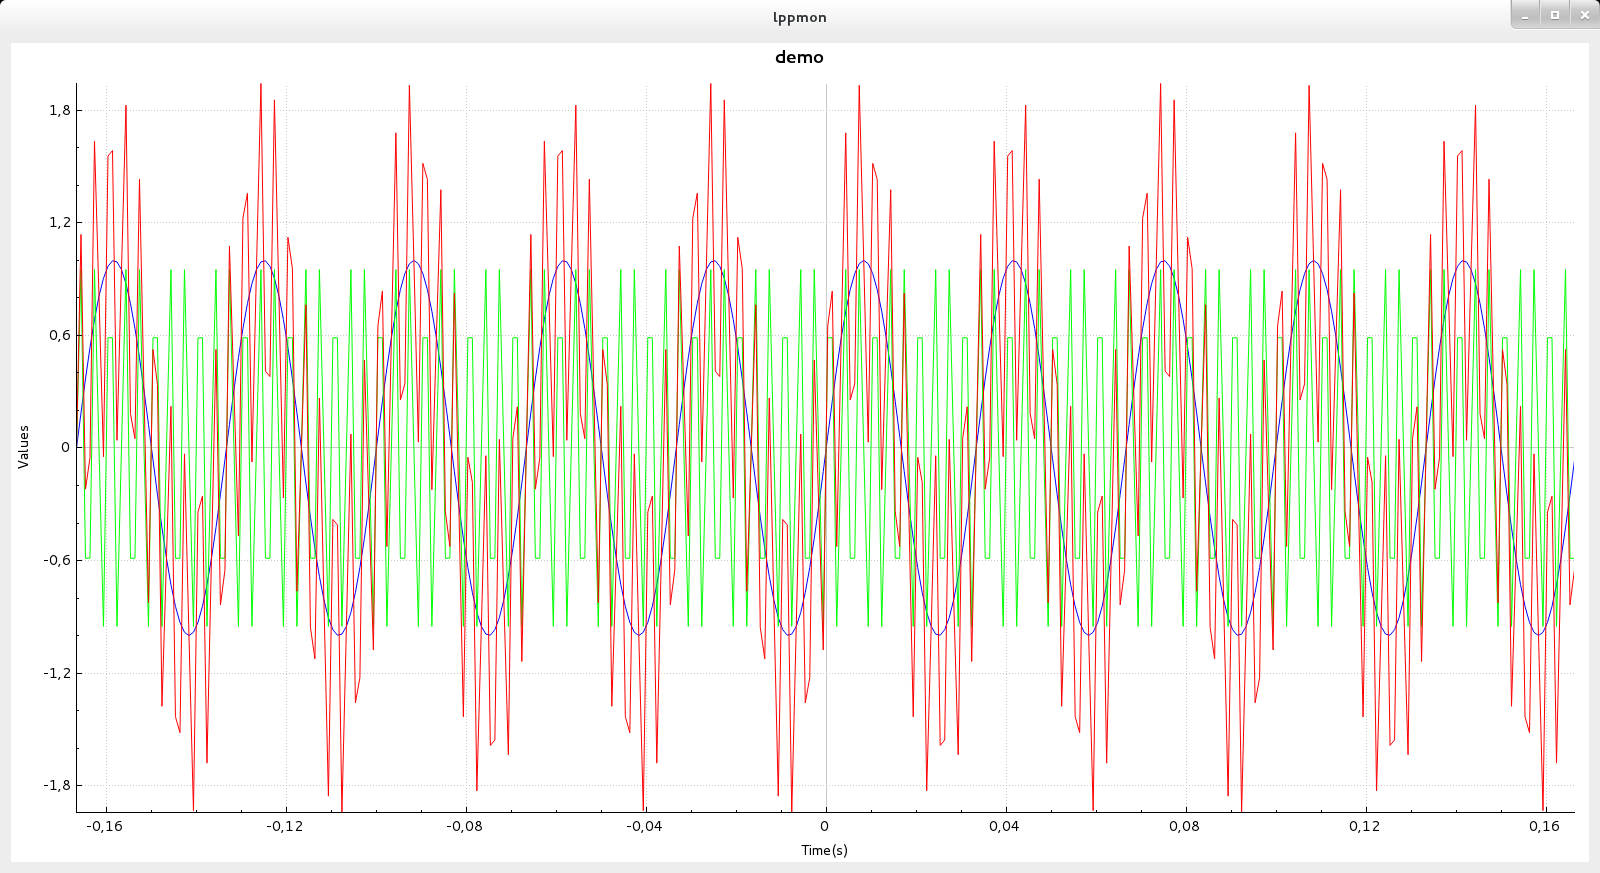
import numpy as np
freq1 = 30
freq2 = 300
time_step = 0.001

t_ini = -50 * 1.0/(max(freq1,freq2))
t_fin = -1 * t_ini

time_vec = np.arange(t_ini, t_fin, time_step)

#input signal
input_sig1 = np.sin(2 * np.pi * freq1 * time_vec)
input_sig2 = np.sin(2 * np.pi * freq2 * time_vec)
input_sig = input_sig1 + input_sig2

plot=PySocExplorer.SocExplorerPlot()
plot.setTitle("demo")
plot.setXaxisLabel("Time(s)")
plot.setYaxisLabel("Values")

Courbe1=plot.addGraph()
Courbe2=plot.addGraph()
Courbe3=plot.addGraph()

plot.setGraphData(Courbe1,time_vec.tolist(),input_sig1.tolist())
plot.setGraphData(Courbe2,time_vec.tolist(),input_sig2.tolist())
plot.setGraphData(Courbe3,time_vec.tolist(),input_sig.tolist())

pen=plot.getGraphPen(1)
pen.setWidth(1)
color=pen.color()
color.setRgb(0x00FF00)
pen.setColor(color)
plot.setGraphPen(1,pen)

pen=plot.getGraphPen(0)
pen.setWidth(1)
color=pen.color()
color.setRgb(0xFF0000)
pen.setColor(color)
plot.setGraphPen(2,pen)

plot.rescaleAxis()
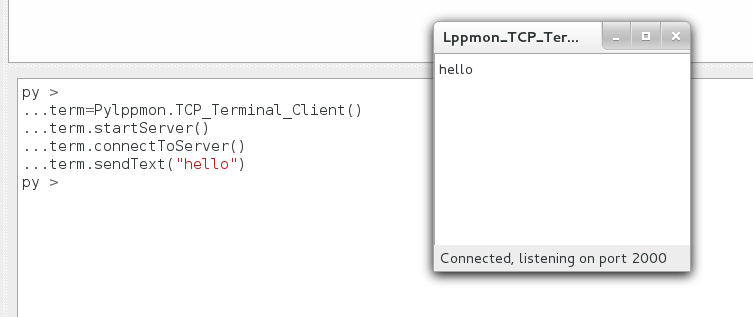
Sometime you need to print some information while your python script is running, unfortunately SocExplorer isn't multi-threaded so you won't get any output until your script execution is finished. To solve this problem with SocExplorer setup you will get a small tcp terminal program which will run in a separated process. From one Python object you will be able to start the terminal process and to send it some data to print. Note that an other utilization of this terminal should be to deport the print outputs on a distant computer.
term=PySocExplorer.TCP_Terminal_Client()
term.startServer()
term.connectToServer()
term.sendText("hello")
Should give you this result
term=PySocExplorer.TCP_Terminal_Client()
#for a distant connection you can specify the distant address and port
#remember to check your firewall setings
term.connectToServer("192.168.1.10",2000)
term.sendText("hello")
import time
terminal=PySocExplorer.TCP_Terminal_Client()
terminal.startServer()
terminal2=PySocExplorer.TCP_Terminal_Client()
terminal2.startServer(2200)
terminal2.connectToServer("127.0.0.1",2200)

terminal.connectToServer()
terminal.sendText("<p><b> "+str(time.ctime())+": </b></p>"+"Hello World")
terminal2.sendText("<p><b> "+str(time.ctime())+": </b></p>"+"Hello World on terminal 2")
terminal.sendText("<p><b> "+str(time.ctime())+": </b></p>")
terminal.sendText("<p><b> "+str(time.ctime())+": </b></p>"+"<ul>HTML Items List Example:<LI>Item1</LI><LI>Item2</LI></ul>")
terminal.sendText("<p><b> "+str(time.ctime())+": </b></p>"+"<p style=\"color:#0000ff\" style=\"background-color:#00ff00\">hello</p>")
for i in range(0,100):
  terminal.sendText("<p><b>"+str(time.ctime())+": </b></p>"+"<p style=\"color:#0000ff\" style=\"background-color:#00ff00\">hello "+str(i)+"</p>")
  time.sleep(0.05)
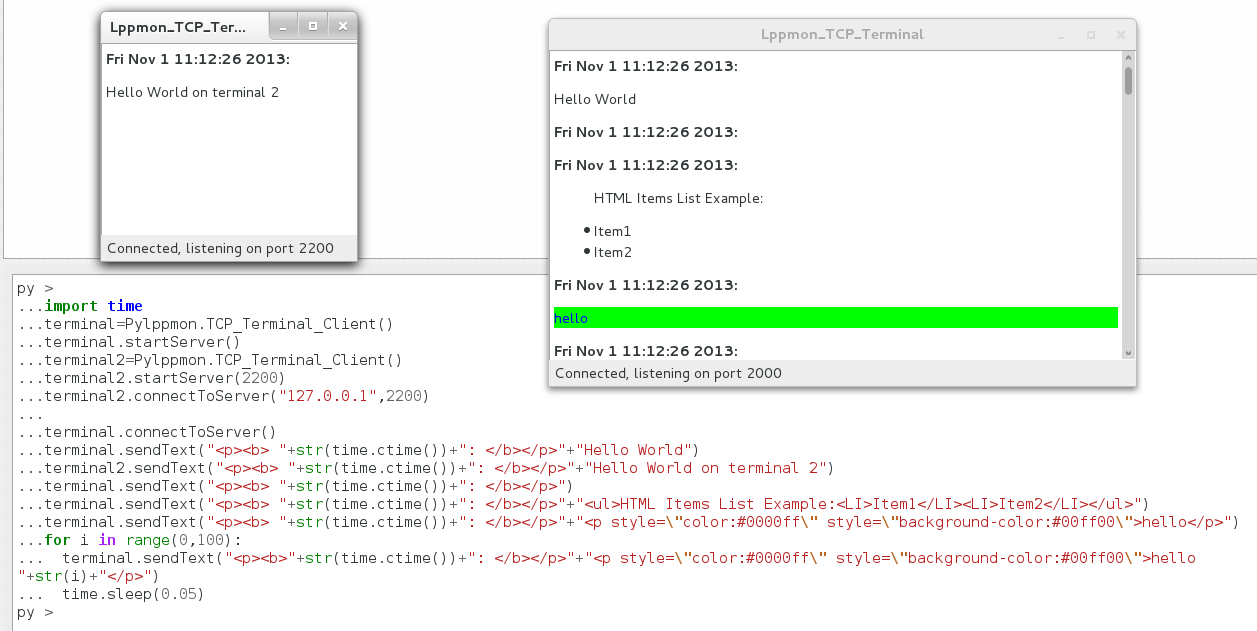
Should give you this result
$2^5$
$\omega = k^{2}$
Child pages:
Win32 setup
Source code
RPM packages
SocExplorer is an open source generic System On Chip testing software/framework. We write this software for the development and the validation of our instrument, the Low Frequency Receiver (LFR) for the Solar Orbiter mission. This instrument is based on an actel FPGA hosting a LEON3FT processor and some peripherals. To make it more collaborative, we use a plugin based system, the main executable is SocExplorer then all the functionality are provided by plugins. Like this everybody can provide his set of plugins to handle a new SOC or just a new peripheral. SocExplorer uses PythonQt to allow user to automate some tasks such as loading some plugins, configuring them and talking with his device. SocExplorer is provided under the terms of the GNU General Public License as published by the Free Software Foundation; either version 2 of the License, or (at your option) any later version.
To report bugs, you need to register in our system them you can report bugs here.
If you don't want to register you can simply send a mail.
In this case, the AHBUARTplugin and the memctrlplugin are loaded. The ahbuartplugin is called a root plugin because it is at the top of the plugin hierarchy, it makes the connection between SocExplorer and the AMBA bus. Talking through the root plugin, the memctrlplugin allows you to test some memory space at a given address. 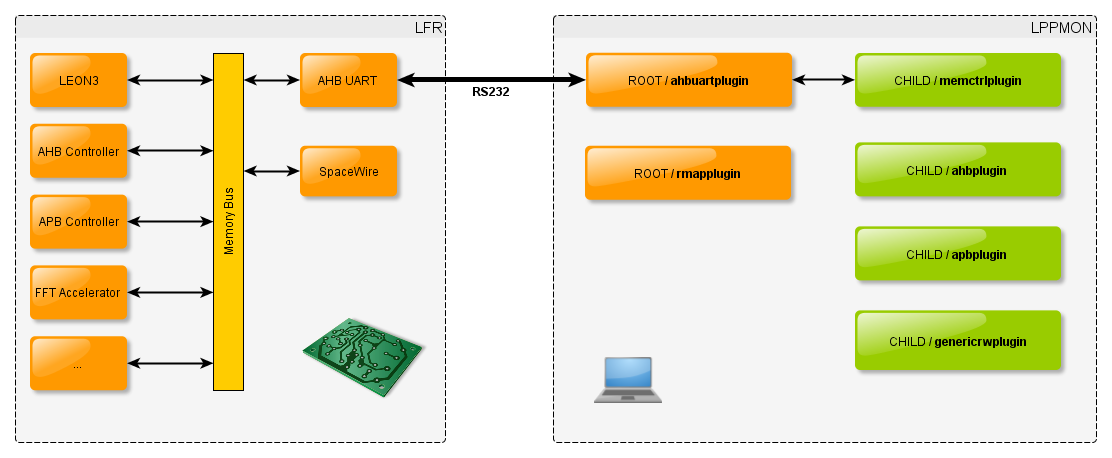
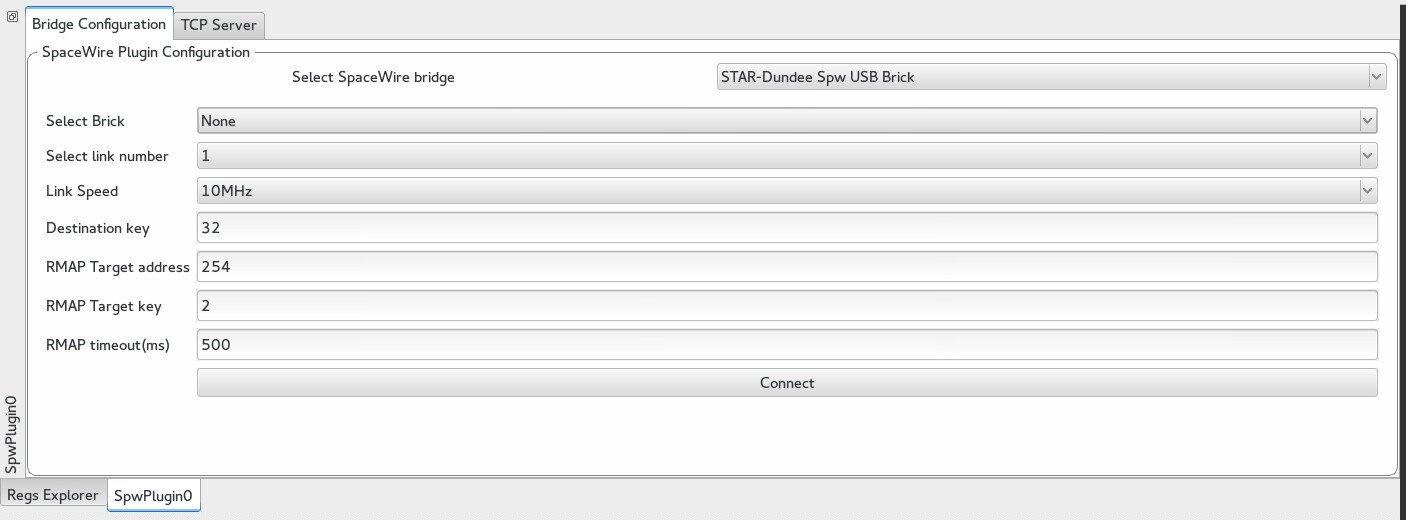
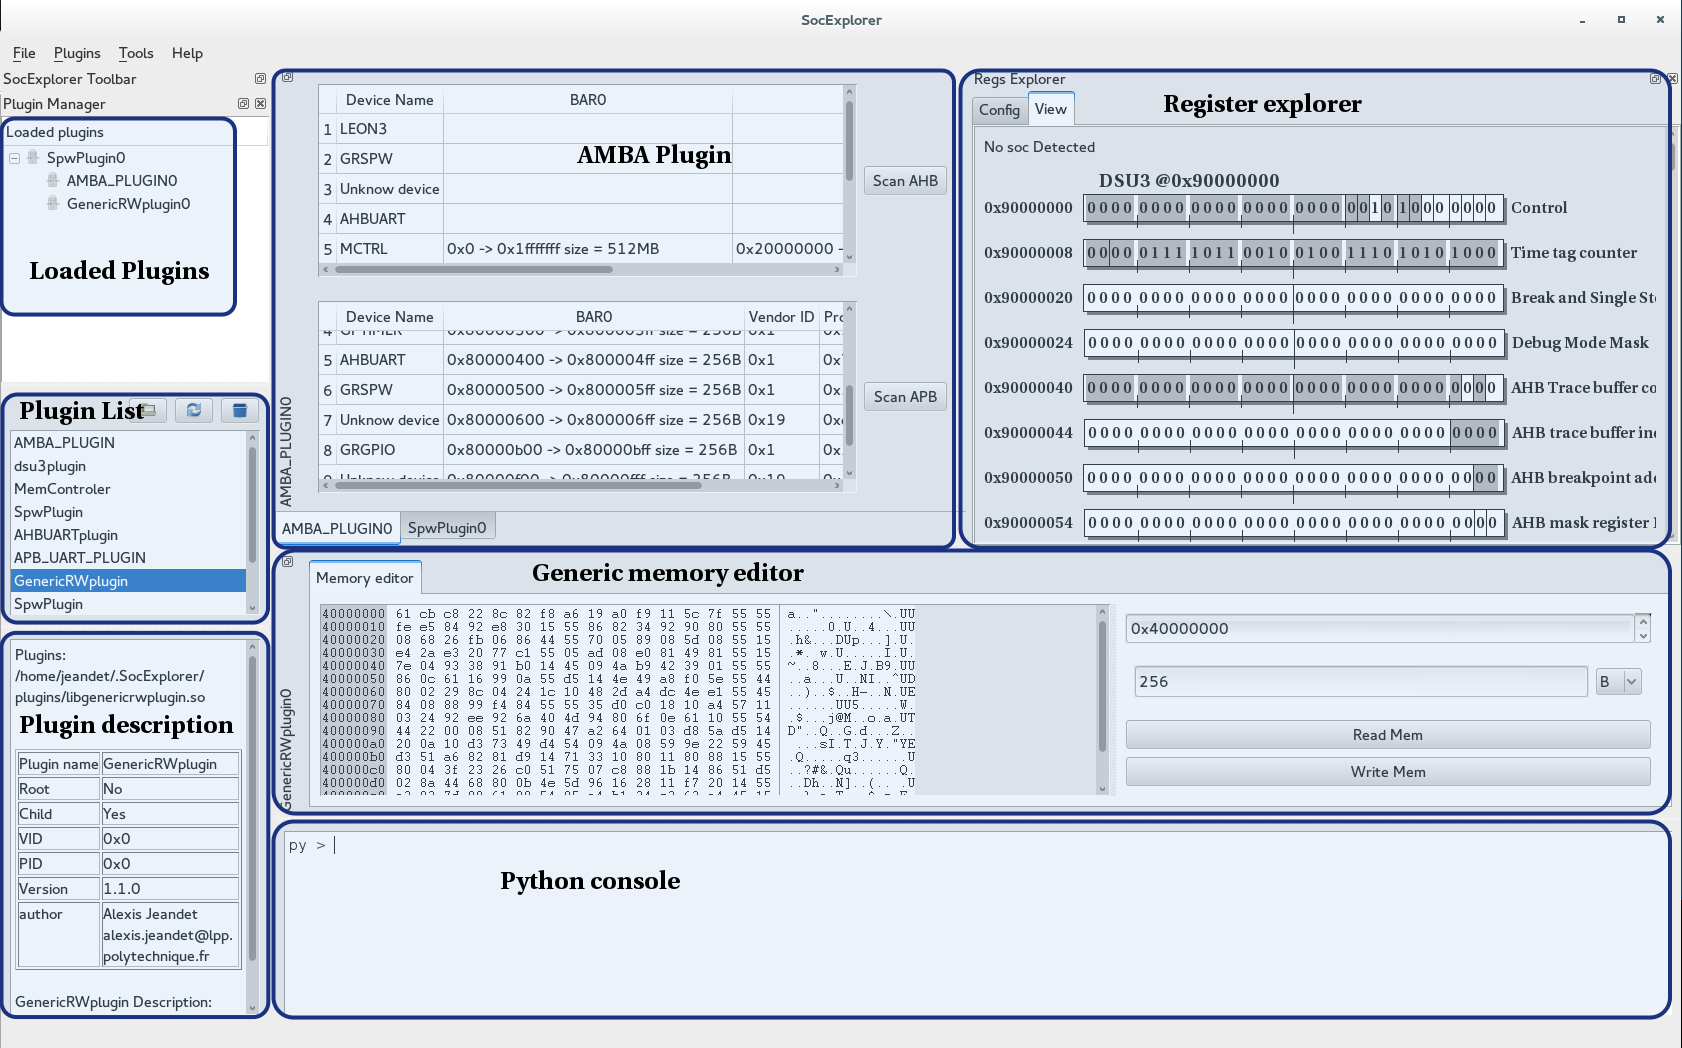
In this use case, the root plugin is the rmapplugin, this plugin allows you to talk through either the GRESB or the stardundee SpaceWire-USB Brick. The second loaded plugin is the genericrwplugin. This plugin is a simple hexadecimal editor, you can use it to view or edit any space of the SOC memory, see below in the SocExplorer screenshot. 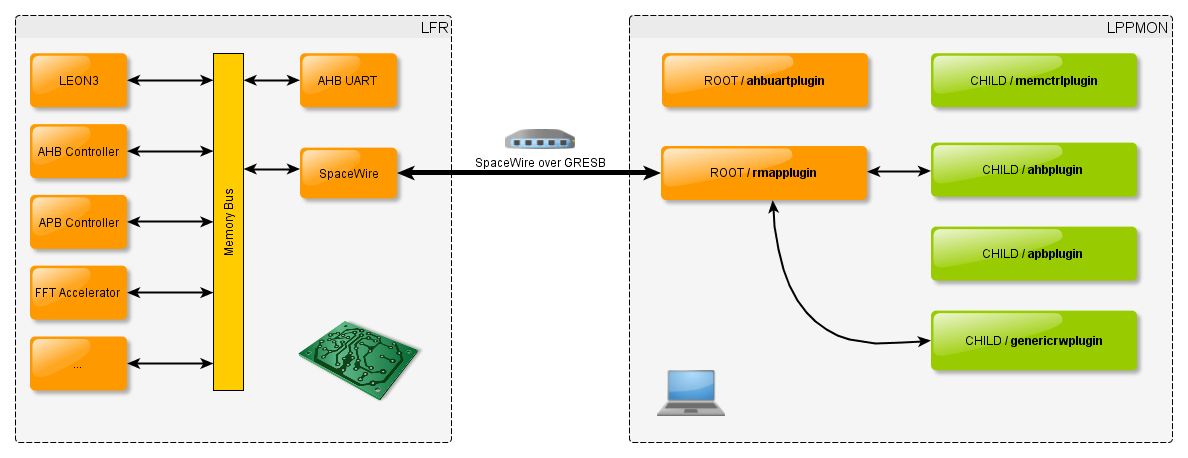
This video is quite outdated but gives a good overview of what SocExplorer is able to do.
Loading the player ...
If the video doesn't load you can directly watch it from here
 |
 |
Updated about 8 years ago by Alexis Jeandet